Thursday, July 18, 2013

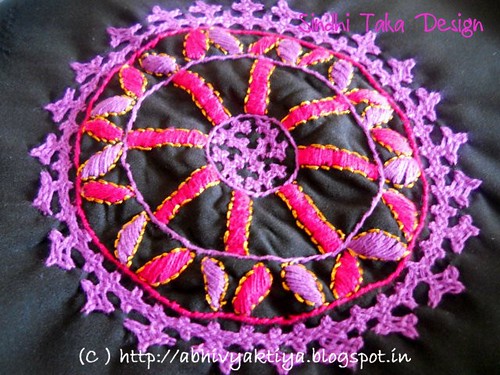
Sindhi Taka Design-3

embroidery pattern for sindhi taka

Doing Sindhi Embroidery is my favorite hobby, after starting any motif or pattern, I try to complete it as soon as possible in order to see the final results.
Unfortunately we have very few books and limited material on net on sindhi embroidery or kutch work. Some times drawing lines and trying to make a pattern give a outstanding results, while watching TV and trying to make new pattern gave existence to the raw draft of this motif.
This motif can be used on front or back of any top or kurti, cushion cover, sari or dupatta or even in bed sheet by using 7-9 circles in different manner.  This is upto you how you use this.
In order to trace any motif on black or dark shade colored cloth yellow carbon is used. In this pattern I have not used tracing simply drawing circles and filling petals made the design.
Description and Instructions for the pattern are as follows:

In the inner most circle round pattern of sindhi stitch is used. A complete tutorial on this is in my earlier post
round pattern in sindhistitch.
Leaves are filled with satin stitch.


Out lines of the petals are made with anchor's golden color thread.
The outer most border which is made with purple color, for its instructions please refer to my earlier post Sindhi stitch borders.
Usually tracing is not required for border or any motif in any sindhi stitch pattern, but constant practice is required. If you are new to it, you can trace it for  ease. In order to get the trace of entire design, use print button of this post and print the picture in gray scale or black and white, you will get the trace that will be helpful to you.


If you like my post please like my facebook page and join my site, and for any queries don’t  hesitate me to ask via comment form.

Monday, July 1, 2013

How to Stitch Chudidar ( Leggings)


Today I am showing you the simple & Easy method of cutting, drafting and sewing leggings or Chudidar. Instructions are simple and for your ease I have prepared a very small sample for this because my point and shot camera is able to cover the whole piece of leggings but unable to show stitches , which are necessary for understanding , with this small sample it will be easy for you to understand.
Basic measurements required for the leggings /chudidar are:
1 complete length of leggings, from waist to toe.
2 leg’s width at toe.
3. Number of gathering or chudis you want in your leggings, for this extra 10-12” length is required.
4. length from you toe to knee( for example if it is 15” + 1” for folding + 12” for gathering it will be 28” (in the picture of draft it is shown  as =  I to J and F to G  )
5. Belt’s width and length( including folding from top for elastic and stitching at bottom part)
6. length from knee to the ending part of belt.( this is G  to H and J to K  in draft).
Instructions :
Things to do before drafting and sewing bag for chudidar or leggings.
Take 2 metres cloth.
      Open it length wise.
      Measure your belt( including 2” for top folding), cut this part of cloth and keep it aside for further use.
     With the remaining long piece bag is to be prepared or stitched before drafting.
    Take the whole length and fold.
Stitch the top fold (  picture below   )

      Stitch the bottom fold( in the same picture, two stitches  )
    Now open it as shown in picture (picture below)   

    Place your finger to the   side of cloth and stretch it towards right side, 


   From b-c stitch part.(shown in picture)

   Bag is complete , quite easy , isn’t it.

Drafting part:

Place bag as shown in Picture  
At this stage you can iron it too for ease.
Drafting Instructions:
Please refer to the drafting image: ( for example on Left hand side)


C to E and F to G is the measurement of toe to knee.( add 1” for bottom folding and ½” for sides if you are adding hooks.)
F G H is a curve line from your knee to the ending point of belt.

        
Sewing Instructions:
Complete belt according to your measurements. Fold the upper part, stitch it from sides, if elastic has to be attached , attach it at this stage or after completing it.
     Take one part of leg, fold the bottom most part of toe. If hooks are to be attached on sides fold -6”length wise from both sides for attaching hooks
     Do the same with other leg part.
      Attach both leg parts with belt , adjust extra part of cloth in form of gathering.
    Finally stitch from   part  FGH  and KJI to complete your leggings.
      For detailed instructions in sewing  you may refer to my earlier post how tostitch salwar(bottom) it will be helpful to you.
Notes:
If you are taking printed cloth for leggings and it print is in particular direction say top to bottom, don’t use this bag method for sewing leggings because in this case print in one leg will be in particular direction and in other leg it will be in different direction, this will look awkward and funny too.
I hope this tutorial will be helpful to you, if any doubt please feel free to ask via comment section.  Please share my posts too.