Showing posts with label kutchwork. Show all posts

Sunday, May 13, 2018

Hand Embroidery: Kutchwork Neck Design Video

This is part I of Neck embroidery design with Kutch and Mirror work. In this part I will show you how to mark Neckline and make the design for tracing. In the second part you will learn how to do the embroidery and fix the mirror on fabric. I hope you will find this tutorial helpful. Please share your thoughts about this video.
Here is the tracing:
how to make tracing for neck embroidery design
Here is the video:


Tuesday, October 18, 2016

SINDHI EMBROIDERY/ KUTCH WORK BORDERS- PART I

In this video tutorial you will learn how to make border with Sindhi Embroidery. This is a
basic border design which gives the look of thin fabric lace. You can try this embroidery
border on your suit necklines, sleeves and side slits with contrast color thread.


Saturday, June 8, 2013

Traingle Pattern : Tutorial on Sindhi Stitch

Sindhi stitch looks very beautiful, though it follows a series of geometrical patterns but after filling it gets a beautiful embroidery look. It is also know as kutch work or kutch embroidery. Traditionally sindhi women do this without any tracing, it looks difficult but once you are familiar with the steps it is easy to do it without any trace of design, now a days for an ease traces are available in some embroidery books. For your ease I have also prepared some sindhi stitch sketches for this particular traingle pattern, with their help you will easily understand the pattern and its 4 different stages and by following them step by step after 3-4 attempts(if it is new to you) you will be able to make the same pattern.


Before proceding further I will suggest you to take a look at my previous post on sindhi stitches especially
Sindhi stitch guide,
Borders
Borders II,
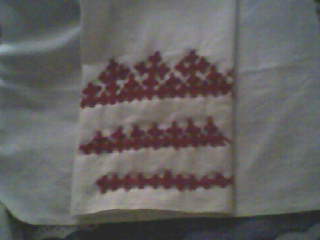
sindhi stitch border on kurta
all these patterns will be helpful to you to understand this much better.
This pattern is slightly complex, I have to spend time in learning this, if you carefully see this is an extension of my post on border on sindhi stitch in kurta.
This traingle can be usde as a border to by attaching one by one, I will show its illustration in my upcoming post, hence this is a tutorial I am showing you a single segment you can use this at various embroidery projects according to your need. This pattern comprise of 4 stages:
Step -1 lowest row of traingle


Step-2 upper part of traingle

step-3 filling of traingle


step-4 filling of lowest row of traingle.

 This pattern moves from left to right(step-1)
Right to left(step-2)
left to right(step-3)
right to left(step-4)

I have written in my first post each &  every pattern ends at the point from where it had began. Starting point and ending point both are same in sindhi embroidery.

If you have any queries please feel free to write me in comment section. If you like this post please like it on face book too. 

Thursday, April 14, 2011

MIRROR FIXING

Mirror work is an essential part of sindhi embroidery, it gives an artistic look to the whole work. I am showing you how to fix a round mirror and some examples of incorporating mirrors in the middle of embroidery, step by step instructions are as follow:
  • on the one end of thread make a ring of thread  it should be approx 85% of size of mirror
  • place a ring over the mirror on cloth and fix the ring with the help of stitch on both side.

  • hold the mirror tightly and start doing the twisted eyelet stitch, always to fix a mirror in single sitting, it is good practice for proper positioning of mirror in your work.
  • complete till mirror if covered with the stitch and fixed.

  • few examples of incorporation of mirror in between the embriodery work the following 2 patterns can  be used in sleeves and back of kurta 

    Please follow my blog, your valuable comments and suggestions will help me to improve my blog. Thanks

Tuesday, April 5, 2011

Sindhi Stitch Design on Kurta

First of All, Happy Cheti Chand to all of you. Yesterday I have completed my new motif of sindhi stitch. I am sharing this with you, your valueable comments are must to improve my blog. I have taken this design from my embriodery book, after having some alterations I have used it in my kurta, for that perfect finishing I have used 4 strands of thread in filling the pattern.  The photo is single block is as below, after adjusting four - five motifs as per your kurta's width you can get the full pattern.

After completling the patterns full look will be as:

Wednesday, March 16, 2011

SINDHI STITCH BORDER ON KURTA

Today I am showing border of sindhi stitch in my kurta.
out line is as below:

After tracing the stitch for outlining will appear as below:


After completing the filling the final work will look like this:
Please send your valuable comments, they will help improving my blog.


Sunday, March 6, 2011

BORDERS II

Hello friends, today I am showing you another version of borders in kutch/sindhi embroidery. After finishing they looks very beautiful. Sketches are as below:


Sketches:


after filling the outlines the final output will appears as below


please give your valuable comments , so that I will improve my blog in future.

Monday, February 28, 2011

BORDERS: SINDHI STITCH

I am showing basic borders of sindhi stitch, sketches are as follows


Complete borders will appear as below:


Saturday, February 26, 2011

ROUND PATTERN IN SINDHI STITCH

Today I am showing the round pattern in Sindhi Stitch. This pattern comprise of three stages.
1. sketch or tracing

2- outling or kacha taaka.

Filling the pattern

You can use this in various ways: in your dress, coushin cover, bags, saree, tablecloth etc. For basics please refer to my earlier post.