Showing posts with label back neck pattern. Show all posts

Wednesday, January 16, 2013

SALWAR KAMEEZ PATTERN-4


This is one of my favorite kurta decorated with floral lace pattern. 


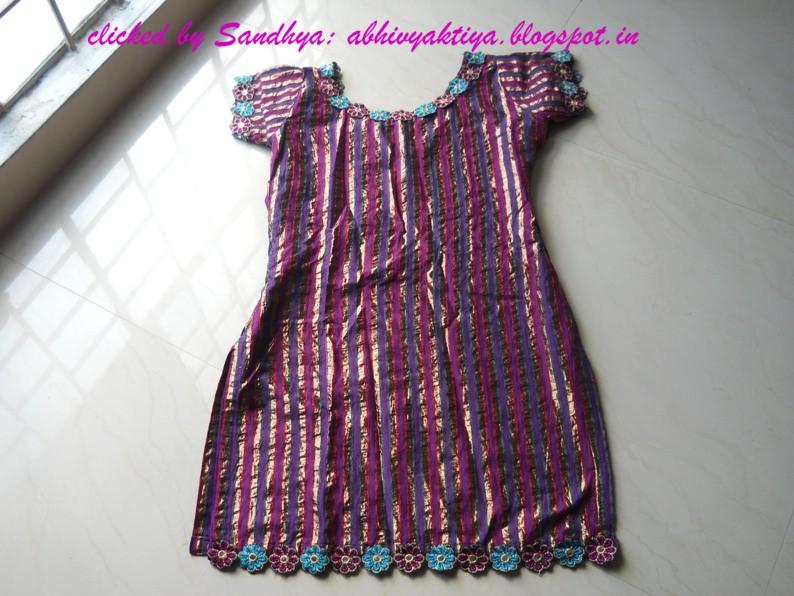
Lace is used in sleeves ,U shaped neck and front bottom. 
kameez its neck and sleeves decorated with floral lace


The back side of the neck is covered with wide lace on two sides and one side is covered with floral lace this give it a unique pattern. Thin strips of the same cloth are attached to form a design. 

One thing I want to explain you that first you should stitch the whole kurta and complete the sleeves like you normally stitch and then attach the floral lace. If you find problem in adjusting the lace on the curve of neck. Please first attach it with hand and then machine stitch it.
Adjust the length of  bottom side of kurta according to lace, as floral lace is attached only on the front side of the kurta. Back side is plain. There is slight difference in length of front and back side.
For cutting and stitching instructions please refer to my earlier post how to stitch kurta

Tuesday, October 16, 2012

SALWAR SUIT PATTERN: 2

This is also a party wear suilt made from silk sari. With one sari I prepared 2 kurtas (one with full sleeves of net and other is of quarter sleeves.) and one semi patiyala golden salwar(bottom).
In first kurta border patch is attached and in the second one back neck pattern has been made with golden strips and Zari lace.
At the point where border and sleeves are attached a golden & black decorative lace is attached.
Golden piping is attached on neckline.
Pictures are self explanatory.


This is a short kurti, it goes well with black leggings and golden semi patiyala salwar too. 

Thursday, July 28, 2011

SALWAR SUIT : PATTERN

This is one of the first party wear suit stitched by me. Stitching instructions of salwar and kurta are already given in my previous posts, you can go throught it.


 As far as this suit is concerned the pink zari cloth had border on both sides and that is used in front and back neck pattern and dupatta is also decorated with border.
The dori  that has been used in pattern is made of pink cotton cloth, because zari cloth was difficult to handle, as it was stiff. Pink beads have been used alternatively with cloth loops on front pattern. For making cloth loops, stripes of cloth were made, they were ironed and cut into small pieces ,


 in the same way on the back neck patterns, small stripes are used and in each stripe , single bead has been insterted and gives a beautiful bow shape.
 Pictures are self explanatory , if you are familiar with stitching, seeing the pattern you can follow it.
Finally in dupatta, border is stitched on both ends. 


Wednesday, June 15, 2011

HOW TO MAKE CORD OR DORI

Today I am showing you the 2 neck patterns.
Neck Pattern 1.
the first neck pattern is a front neck pattern in which double pink and white cord or dori has
been used, after adding piping to the neckline, cord is folded and added.
Neck Pattern 2

In this pattern red and yellow color strpes of cloth are added in a matt form, each stripe is
decorated with golden thread, gives the whole pattern a  embroidery look, after adding
border of red color to the round shape line, cord has been added to tie.
 In Both patterns one thing is common is the use of Cord or dori. In first neck pattern the
pattern itself is made from dori while in second pattern dori is attached , the process of
making dori in both patterns is same let me explain.

How to make Cord or Dori


For making dori you need 2 needles One big size and second (Picuture No.1)as small as it
can pass through the 1 one.
1- According to the length of cord take 1'' wide cloth and sew near to fold Picuture No.2
2- On the one edge to cloth place long needle(from back side) in between the cord(Picuture
No.3)
3- With the Help of small neddle stitch cloth with big needle, it shold be tight, while streching
the joint should not be broken.(Picuture No.4) as per picture no.4 whole length of cloth
should be kept on big needle, it is important otherwise you will not be able to stretch the dori.
4- Try to strech the needle(Picture No.5-7) from the cloth and enjoy the fun.
After making for 3-4 times you will be able to make doris of your choice.